Managing Addresses
In the Data Manager, you can create or delete addresses etc. In addition, you can apply the addresses as stop-off points in the route planning.
Note: To work with addresses, you must first open the required address database in the Administration tab (see Open Database)
Overview of the interface
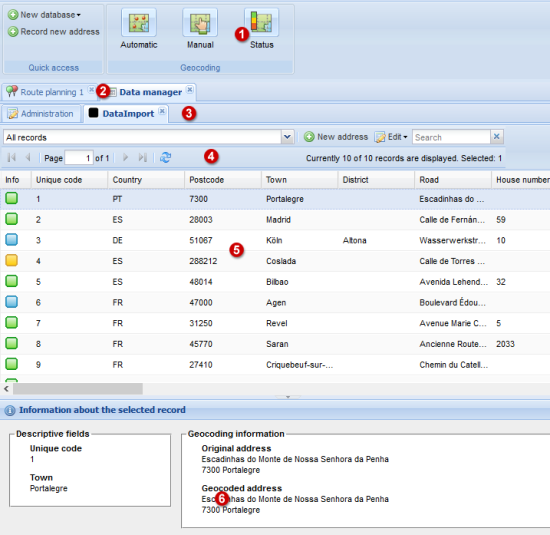
(1) Use case toolbar
On the toolbar you open use cases and use functions specifically for the selected use case (see Data Manager toolbar ).
(2) Address database tab
All addresses are listed in the tab of a particular address database.
Note: All the available databases are displayed in the Administration tab. (see Managing databases).
(3) Toolbar
The following functions are available on the toolbar or via the context menu.
| Element | Description |
|---|---|

|
Using the drop-down list you can filter the addresses according to the precision of the geocoding (see Selecting records for post-geocoding). |
 New address New address |
Create a new address (see Creating an address). |
 Edit Edit |
Opens a drop-down list with the following functions. |
 Change Change |
Opens a window in which you can edit the data for the selected address (see Modifying addresses). Tip: Alternatively, you can open and edit the address in a separate window:Edit > |
 Duplicate Duplicate |
Duplicates the selected address. The data of the duplicated address can then be edited (see Modifying addresses). |
 Manual geocoding Manual geocoding |
Activates the manual geocoding for the selected records (see Manual post-geocoding of records). |
 Transfer to Stop-Off Point List Transfer to Stop-Off Point List |
This applies the address as a stop-off point in the route planning. |
 Delete Delete |
Deletes the selected address. |
 Export Export |
This exports all the addresses as a CSV file. |
|
Search field
|
Entering a search term. |

(4) List of addresses
This is where all the addresses in the records are displayed.
Tip
In the Info column of the address list, different coloured symbols are used to show whether there is a difference between the location data in the imported address and the address on the map. Addresses moved manually are also identified.
If the symbol is missing in the Info column, this means that the address could not be geocoded.
| Symbol | Description |
|---|---|

|
The imported address data matches the allocated address on the map. |

|
The imported address was manually post-geocoded on the map. |

|
Small differences between the imported address data and the allocated address on the map. For example, this may occur if the imported address has a house number which has not been found by PTV Map&Guide internet in the location database. The data set is then geocoded on the centre of the street. |

|
The imported data record was allocated a position on the map using the coordinates given. |

|
There are relatively large differences between the imported address data and the assigned address on the map. |
(5) Scroll through data
In the case of large databases, the data can be scrolled through page-by-page using the symbols.
This button  updates the data. Changes which other users have made are displayed.
(6) Detailed view
The detailed view gives detailed information about the selected address.
Geocoded address: As soon as the address is geocoded, the address from the PTV Map&Guide internet locations database is displayed.
Original address: An address that was entered manually is the address that was entered first and saved. For imported addresses, the transferred import addresses is shown.
More information can be found in the article What is the difference between the original address and the geocoded address?