FAQ - frequently asked questions
In this section you will find answers to frequently asked questions.
Minimum wage ...
Route planning ...
You can specify which countries you do not want to drive through.
Note: This setting has no effect for reference vehicles.
-
In the title bar, click on
 Settings.
The Settings window opens.
-
In the navigation tree, select the entry
 Route planning >
  Specifications.
 -
In the Avoid countries section, select the countries that you want to exclude from route planning.
If the map shows only the stop-off points but no route, this may be because you have set locations to not visible.
-
In the Route section on the toolbar above the map, click on
 Visibility.
The window Visibility opens.
-
In the Map objects > Map tab, select the entry

 Locations.
 -
Plan the route again.
(Do you want the routes you have created to be available for all colleagues to use, but only want to be able to change or delete the routes yourself?PTV Map&Guide internet allows you to do this with the Lock route function.Save and lock routesCreate a new route.On the toolbar, click  Save as.Save the route in the folder Shared within your company with the option Lock route enabled.
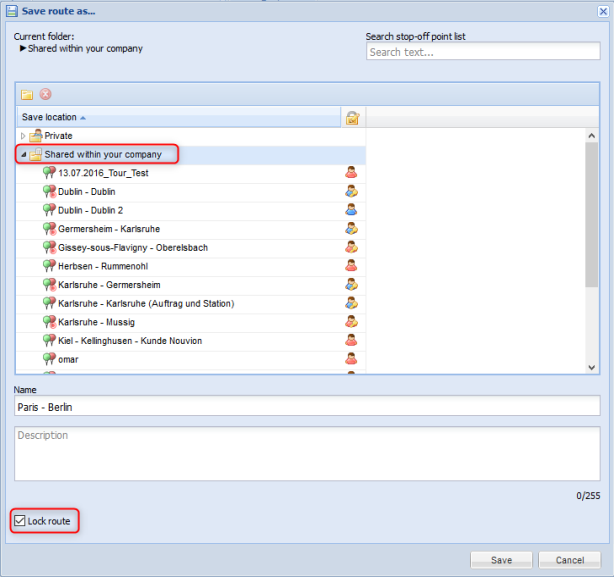 The route will be visible to all colleagues, but you will be the only one who can change or delete it.Lock saved routes laterYou can lock routes you have created yourself later by opening the route and saving it again with the option Lock route enabled. On the toolbar, click on
  Open.The window Open route is displayed. You can identify the routes you have created yourself by the blue user symbol
  in the
  column.
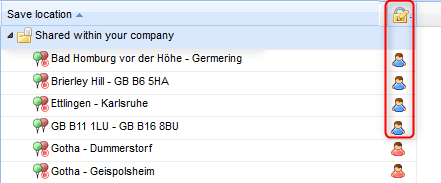 Choose your desired route in the Open route window.On the toolbar, click
  Save as.Save the route as the same name and with the option Lock route enabled.The route is write-protected for other users and marked with the
  symbol.
The default values for driving times and rest periods are stored in the vehicle and can be adjusted there.

|
If you enable the Driving times and rest periods button in route planning, the values stored in the vehicle are taken into account by default. Right-clicking on the button gives you the option to apply remaining times from a previous route, or you can enter custom values. Important: Please note that the setting remains active in the current session until it is changed again. For example, if you have selected the entry Custom, this setting will be active for every new instance of route planning. If you log off from PTV Map&Guide internet without saving the profile, the setting is reset and route planning with driving times and rest periods is again based on the default values from the vehicle. |
-
In the title bar, click on

-
Select the
 Vehicle Management entry from the context menu.
Vehicle management opens in a new tab.
-
From the list, select the vehicle whose values you want to change.
The Edit vehicle <vehicle name> window opens.
-
Switch to the Break times tab.
-
Enter the desired values in the Break regulations and Rest period regulations sections.
-
Right-click the
 Driving times and rest periods routing parameter.
 -
Select the Custom entry from the For new routes drop-down list.
-
Enter the desired values in the Rest times and Break times sections.
If you have already calculated a route with the vehicle, you can use the remaining times in a new route.
Note: If there are no remaining times, all values are reset to the vehicle default times.
-
Right-click the
 Driving times and rest periods routing parameter.
 -
Select the Use remaining times from route entry from the For new routes drop-down list.
-
Enter the desired values in the Rest times and Break times sections.
If you have created databases with customers in the Data Manager use case, you can search for a customer in route planning and use the address as a stop-off point.
Example
You have created a Customer database in the Data Manager. Every customer has a unique customer number which is in the CustomerID field. You are searching for the customer with customer number 1016
Option 1
-
Under
 , select the Customer database.
Tip: The search will be faster if you only select your desired database and deselect all other databases.
-
Enter the customer number in the Search Term field and press Enter to confirm.

-
The list of results will show all matches from the selected databases.
Option 2
You can also search for a customer number using the address input field. If you add a "+" sign before the search term, a search will be conducted for the value across all databases in which quick search has been activated and in which search fields have been set.
Note: The databases that you have selected under  are not taken into account during this process. The Ferries database is automatically selected for quick search.
-
In the address input field, enter a "+" and the value for which you want to search.

The list of results will show all matches from the databases for which quick search has been activated.
Unable to find the customer?
If the customer is not shown, the Customer database has not been selected for quick search or the CustomerID field has not been declared as a search field.
-
Switch to the Data Manager use case.
-
From the list in the Administration tab, select the Customer database.
-
Above the list, click
 Edit >
  General Details.
 -
Ensure that the use database for quick search option is enabled and click OK to confirm.
-
Above the list, click
 Edit >
  Data Structure.
 -
In the Adapt Structure window, click the arrow next to the CustomerID field name and ensure that the option to enable search by field content is checked.
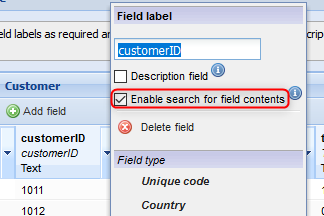
-
Confirm your entry by clicking OK.
If there is a customer with customer number 1016 in the Customer database, it will be found if you re-enter +1016.
This can happen in the case of a route-based toll when a long route runs almost exclusively on toll roads.
In PTV Map&Guide internet the route length is calculated on a different data basis than the toll route.
-
Route length: On the map, each street is divided into segments. There are different attributes for each segment, for example the length or the average speed. PTV Map&Guide internet adds the length of each segment from the map to the total route length.
-
Toll route: Segments are also used to calculate tolls. However, in this case the toll operator's toll segments are used. Germany's toll operator TollCollect, for example, rounds the length of segments up or down to the closest 100 metres. Therefore the length of a segment from TollCollect is not identical to the length of a segment from the map. Even if the difference is minimal for a single segment, there may be a difference in the total, especially for long distances.
Over 34,000 parking spaces from Truck Parking Europe are integrated into PTV Map&Guide internet and you can use them to plan drivers' rest periods and breaks.
Note: If the parking can be booked, a button will be shown in detailed view so that you can complete the booking.
-
In the title bar, open the
 Route Planning use case.
 -
Enter the stop-off points on the route (see Entering route stop-off points).
-
Right-click on
 Route corridor in the Settings area.
 -
Select
 Truck Parking Europe.
 - Calculate the route.
- Switch to the Itinerary tab.
The parking spaces found along the route are displayed in the itinerary.
Tip: You can specify different filter criteria to find the right parking (see Find parking spaces).
In PTV Map&Guide internet, enter all of the costs into a cost profile. You can assign the cost profile to vehicles or select them in a targeted manner during route planning.
-
In the title bar, click on

-
Select the
 Vehicle Management entry in the context menu.
Vehicle management opens in a new tab.
-
Click on the Cost profiles tab.
-
Click
 New in the toolbar or open an existing cost profile.
 -
Enter the following values into the Route-based costs area.
Fuel consumption (l per 100 km
Enter the fuel consumption in litres per 100 km.
Fuel price per l
Enter the price of fuel in EUR per litre.
Fuel costs per km Display of the calculated fuel costs per km. -
The calculated costs are shown under Route costs (per km).
If you select the amended cost profile in route planning, the consumption and fuel costs are shown in the route calculation result.
By double-clicking on a route planning tab you can change its name. If you want to show the tab again when you next start it up, you must save the profile.
-
In the title bar click
 My account > Save profile.
The window PTV Map&Guide internet - Save profile opens.
- In the View area, activate the options Open use cases and Additional information.
- Confirm your entries with Save.
The default values for driving times and rest periods are stored in the vehicle and can be adjusted there.

|
If you enable the Driving times and rest periods button in route planning, the values stored in the vehicle are taken into account by default. Right-clicking on the button gives you the option to apply remaining times from a previous route, or you can enter custom values. Important: Please note that the setting remains active in the current session until it is changed again. For example, if you have selected the entry Custom, this setting will be active for every new instance of route planning. If you log off from PTV Map&Guide internet without saving the profile, the setting is reset and route planning with driving times and rest periods is again based on the default values from the vehicle. |
-
In the title bar, click on

-
Select the
 Vehicle Management entry from the context menu.
Vehicle management opens in a new tab.
-
From the list, select the vehicle whose values you want to change.
The Edit vehicle <vehicle name> window opens.
-
Switch to the Break times tab.
-
Enter the desired values in the Break regulations and Rest period regulations sections.
-
Right-click the
 Driving times and rest periods routing parameter.
 -
Select the Custom entry from the For new routes drop-down list.
-
Enter the desired values in the Rest times and Break times sections.
If you have already calculated a route with the vehicle, you can use the remaining times in a new route.
Note: If there are no remaining times, all values are reset to the vehicle default times.
-
Right-click the
 Driving times and rest periods routing parameter.
 -
Select the Use remaining times from route entry from the For new routes drop-down list.
-
Enter the desired values in the Rest times and Break times sections.
You can show or hide columns in lists, change their order and save all changes in the profile, for example in the route planning results or in the list of stop-off points.
Show or hide columns
-
Move the mouse to the right corner of the column heading.
A small arrow appears.
-
Click on the arrow and select the desired entry from the context menu.
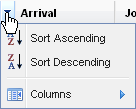
-
If you wish to show additional columns or hide existing ones, click the entry Columns and highlight the required entries in the context menu.
-
If you wish to sort the list, select
 Sort Ascending or
  Sort Descending.
Note: The entries are greyed out if sorting the data is has little effect.
Change order of columns
You can move columns with the mouse. Click on the column heading, hold the left mouse button pressed and move the column to the desired position. If two blue arrows  are displayed between the tabs, you can "drop" the column.
Save changes to the profile
-
In the title bar click
 My account > Save profile.
The Save profile window opens.
-
In the View section, select the Column formats options.
-
Confirm your changes with Save profile data.
Tip: If you always want to save the view when you exit, enable the  Save profile on exit option under
  My account.
Data Manager ...
Other
You can use all common browsers. However, depending on which browser type and version you use, it is possible that not all functions will be supported.
Notes: We cannot guarantee that our program can be used without problems with browser versions which are not shown in the list.
-
Firefox Browser 105
-
Chrome 105
-
Microsoft Edge 105
Notes:
Since browser versions are updated regularly, there is still no official release for the latest versions.
Please note that JavaScript must be enabled in your browser settings. Java, Flash or Silverlight are not required.
Screen resolution
Please note that the surface of PTV Map&Guide internet has been optimised for a minimum resolution of 1280x1024 pixels.
If an area of the PTV Map&Guide internet screen is not displayed in full and you cannot expand or minimise it, this may be due to Windows' scale settings.
If these have a value other than 100% selected, this can cause display problems.
In Windows 10 you can check the settings by following these steps:
-
Right-click on your desktop.
-
Select the entry Display settings in the context menu.
- Check the settings under Change size of text, apps and other elements. These should be set to 100%.
Calculation according to HBEFA
-
Group 1 (well-founded measurement programs)
CO (carbon monoxide), HC (hydrocarbons), NO2 (nitrogen dioxide), NOx (nitrogen oxide), PN (particle matters), fuel (fuel consumption) CO2 (carbon dioxide total and fossil)
Note: In addition, the greenhouse gas potential (CO2 equivalent, CO2e or GWP [Global Warming Potentials]) is calculated. The CO2e value is calculated using CO2 (carbon dioxide total [factor 1]), N2O (dinitrogen monoxide; nitrous oxide [factor 298]) and CH4 (methane [Factor 25]).
Example:
CO2 total 255.56 kg, N2O 22.19 g, CH4 0.37 g
Factors: CH4 x25, N2O x298
Calculation: CO2e = 255.56 kg + (22.19 g x 298) + (0.37 g x 25) = 256.22 kg -
Group 2 (supplementary measurement programs and literature research)
Pb (lead), SO2 (sulphur dioxide), CH4 (methane), NMHC (non-methane), C6H6 (benzene), C7H8 (toluene), C8H10 (xylene)
- Group 3 (indicative literature references)
NH3 (ammoniac), N2O (nitrous oxide)
Calculation according to EN 16258
Note: Please note that for the calculation of emissions in accordance with EN 16258 the emission of CO2e is determined.
| Element | Description |
|---|---|
| Energy - WTW
|
WTW (Well to Wheel) Energy consumption in megajoules from the source up to and including the journey. |
| Emissions - WTW |
WTW (Well to Wheel) CO2e emissions in kilograms from the source up to and including the journey. |
| Energy - TTW |
TTW (Tank to Wheel) Energy consumption of the journey in megajoules. |
| Emissions - TTW |
TTW (Tank to Wheel) CO2e (in kilograms) produced during the journey. |
| Energy - WTT |
WTT (Well to Tank) Energy consumption in megajoules from the source up to the journey. |
| Emissions - WTT |
WTT (Well to Tank) CO2e (in kilograms) produced up until the journey. |
Calculation in accordance with decree no. 2017-639
| Element | Description |
|---|---|
| Emissions - WTW |
WTW (Well to Wheel) Emissions of CO2 in kilograms from the source up to and including the journey. |
| Emissions - TTW |
TTW (Tank to Wheel) CO2 (in kilograms) produced during the journey. |
| Emissions - WTT |
WTT (Well to Tank) CO2 (in kilograms) produced up until the journey. |
To enable you to work more quickly and efficiently, we have summarised the most important shortcuts.
Selecting and navigating on the map
| Function | Shortcut |
|---|---|
| Select an object | Click object |
| Deselect an object | CTRL + click selected object |
| Select several objects | CTRL + click objects |
| Deselect several objects | CTRL + click selected objects |
| Select all objects in an area |
CTRL + ALT + drag frame |
| Add selected objects to the list of stop-off points |
F8 Note: If you have selected an object, PTV Map&Guide internet calculates the optimum position in the stop-off point list and reorganises them accordingly. If you have selected several objects they are inserted at the end of the stop-off point list. |
| Navigating on the Map | Arrow buttons |
| Moving the map section | CTRL + arrow buttons |
| Drag open a zoom square | Shift + left mouse button |
| Show full screen map | CTRL + ALT + space bar |
Edit list of stop-off points (route planning)
| Function | Shortcut Key |
|---|---|
| Close list address search list | ESC |
| Copy stop-off point | CTRL + C |
| Cut stop-off point | CTRL + X |
| Paste stop-off point | CTRL + V |
| Delete stop-off point | DEL |
Edit routes (route planning)
| Function | Shortcut Key |
|---|---|
| Copy stop-off points into a new route | Mark stop-off points, hold down CTRL and drag and drop stop-off points onto tab  . . |
| Move stop-off points into a new route | Mark stop-off points and drag and drop onto tab  . . |
| Copy stop-off points into existing route | Mark stop-off points, hold down CTRL and drag and drop stop-off points onto a different tab with a route plan. |
| Move stop-off points into a new route |
Mark stop-off points and drag and drop them onto a different tab with a route plan. |
Open and save routes
| Function | Shortcut Key |
|---|---|
| Open saved route | CTRL + O |
| Open saved route (quick access) | Ctrl + Alt + O |
| Saving route | CTRL + S |
| Save route (quick access) | Ctrl + Alt +S |
| Save route as ... | Ctrl + Shift + S |
| Save route as ... (quick access) | Ctrl + Alt + Shift + S |
Route Calculation
| Element | Shortcut Key |
|---|---|
| Calculate the route | F9 |
Edit address list (Data Manager)
| Function | Shortcut Key |
|---|---|
| Mark all records | CTRL + A |
| Delete selected records |
DEL or <--- (Return key). |
| Back one data page | PgUp |
| Forward one data page | PgDn |
General Functions
| Function | Shortcut Key |
|---|---|
| CTRL + P |
The private data of a user is deleted, even if you are blocked:
- Private vehicle profiles
- Private stop-off point lists
- Private exchange rates
- Private pricing models
- Private routing profiles
For protected, shared profiles within the company, the protection is removed.
The route information and the map are converted to PDFs and displayed in your browser in a new window or tab.
If you receive an error message when printing, this may be caused by one of the following:
-
You are using a plug-in to display PDF files which is not compatible with PTV Map&Guide internet. Deactivate the plug-in and try printing again. Alternatively, you can use a different plug-in to print.
-
You have activated a popup blocker which prevents a new tab / window from being opened to display the print-ready PDF.
-
You have refreshed the active tab / window with the print-ready PDF, e.g. by pressing F5 or CTRL + R. It is not possible to refresh the print-ready PDF in PTV Map&Guide internet.
You can specify in vehicle management which vehicles are displayed in the route planning drop-down list.
-
In the title bar, click on

-
Select the
 Vehicle Management entry from the context menu.
Vehicle management opens in a new tab.
-
Highlight in the vehicle list in the Visible column the vehicles which are to be displayed in the route planning drop-down list.
Tip: Alternatively, you can show and hide vehicles using the  Edit context menu.
You can export a vehicle profile from PTV Map&Guide internet as an XML file. An exported vehicle profile can be reused in the PTV xServers.
-
In the title bar, click on

-
Select the
 Vehicle Management entry from the context menu.
Vehicle management opens in a new tab.
-
Above the vehicle list, click on
 Edit.
Edit. -
From the context menu, choose
 Export vehicle profile.
In the Sent routes use case, the routes of all users are shown. If you only want your own routes to be shown, you can search or filter with your user name.
-
Open the
 Sent Routes use case.
 -
Enter your user name in the search box and confirm by pressing Return.
Note: Alternatively, you can filter by your user name by clicking on the little triangle
 in the User ID column.
A point on a map is always described using a pair of coordinates, the latitude and the longitude.
In tender+, addresses can be imported and geocoded based on your coordinates.
To do this, define the relevant format with an ID number in the Coordinate System column and enter the longitude in the Longitude column and the latitude in the Latitude column.
The following coordinate formats can be imported:
-
WGS 84 decimal (ID 0)
Reference system is WGS 84 (World Geodetic System).
The coordinates are specified in decimal degrees,
Example
Haid-und-Neu-Straße 15, 76131 Karlsruhe
Latitude 49.01334° (N) Longitude 8.4278° (E)
Information in the import file
Longitude Latitude Coordinate System 8.4278
49.01334
0
-
PTV geodecimal (ID 1)
Equals the WGS 84 decimal * 100,000
Example
Haid-und-Neu-Straße 15, 76131 Karlsruhe
Latitude 49.01334° (N) Longitude 8.4278° (E)
Information in the import file
Longitude Latitude Coordinate System 842780
4901334
1
-
PTV Mercator (ID 3)
Reference system is a Mercator projection.
The Mercator format is an internal coordinate format which you can use to replace geographical data in PTV products.
If, for example, you export a database, you receive the coordinates in the Mercator format. You can import data records exported in this way into other PTV products and geocode them on the basis of the coordinates.
Example
Haid-und-Neu-Straße 15, 76131 Karlsruhe
Longitude Latitude Coordinate System 937139
6270074
3
Note: This function will only be available to you if you have administrator rights.
You can obtain an overview of the calculations that have already been used and the calculation credits that have been purchased in the administration tool from PTV Map&Guide internet.
You can switch to the administration tool via the title bar >  My account >
  Administration tool. You can use the navigation tree > Reports >
  tender+to display an overview.
Alternatively, you can download a PDF with the relevant data from the reports toolbar > tender+ area > Transaction overview  .
.
You can purchase new calculation credits at any time. To do so, please contact our sales team.
The contact details can be obtained in the tender+ use case by clicking on  Buy in the toolbar in the Calculations area.
You can hide the Support Chat in the settings.
-
In the title bar, open the
 Settings window.
 - Go to
 General >
  Settings > View area and activate the option
  Hide Support Chat.
In the Perimeters use case
-
You can show or hide individual perimeters in the list via the Perimeter visible column.
-
You can show or hide all perimeters via the toolbar.
In other use cases
-
In the toolbar above the map, click on
 Visibility.
 -
Select the
 Map layers tab.
 -
Under Foreground, deactivate the option Perimeters.
To see the fuel costs incurred on a route, you can enter consumption and the fuel price into a cost profile (see Create cost profile ).
You assign the cost profile to a vehicle and as a result of route calculation, the fuel costs for the route are shown.
In PTV Map&Guide internet, enter all of the costs into a cost profile. You can assign the cost profile to vehicles or select them in a targeted manner during route planning.
-
In the title bar, click on

-
Select the
 Vehicle Management entry in the context menu.
Vehicle management opens in a new tab.
-
Click on the Cost profiles tab.
-
Click
 New in the toolbar or open an existing cost profile.
 -
Enter the following values into the Route-based costs area.
Fuel consumption (l per 100 km
Enter the fuel consumption in litres per 100 km.
Fuel price per l
Enter the price of fuel in EUR per litre.
Fuel costs per km Display of the calculated fuel costs per km. -
The calculated costs are shown under Route costs (per km).
If you select the amended cost profile in route planning, the consumption and fuel costs are shown in the route calculation result.
You can export a vehicle profile from PTV Map&Guide internet as an XML file. An exported vehicle profile can be reused in the PTV xServers.
-
In the title bar, click on

-
Select the
 Vehicle Management entry from the context menu.
Vehicle management opens in a new tab.
-
Above the vehicle list, click on
 Edit.
Edit. -
From the context menu, choose
 Export vehicle profile.
Some regions and cities in Europe have their own rules intended to reduce traffic in urban areas and improve air quality.
These special areas are gradually being integrated in PTV Map&Guide internet. In PTV Map&Guide internet the areas are shown on the map. The comments for the stop-off point provide information about the special conditions.
You can show or hide special areas on the map via  Visibility (see Map functions).




 , select the records for which you wish to perform geocoding (see


 symbol.