Changing the database
Note: Before making structural changes to a database, you should create a backup copy of it (see Creating and restoring a backup copy of a database)).
-
Open the Data Manager (see Opening Data Manager). ).
-
In the list, select the database whose structure you wish to change.
You have the following options:
-
Change names and access rights.
-
Editing the geographic details
Use geocoding coordinates instead of address data or vice-versa.
-
Change field types or field labels, or add and delete new fields.
Tip: For example, here you can change the assignment of the coordinates if you have swapped the x and y coordinates during importing.
-
Changing symbols and labels of addresses on the map as well as the display of the database in the program
Changing general details
-
Select
 Edit >
  General Details on the toolbar above the list.
The General Details window opens.
-
Make the desired changes.
Element Description Entry field Name of database Entry of a meaningful name
The name of the database which is assigned here, appears for example in the list of databases.
 The data are shared by all authorised users within your company.
If this option is enabled, the data are visible to all employees in the company (read-only access).
If you deselect this option, only you have personal access to the address list. The address list is not displayed for other employees in the company and the addresses cannot be used by other people in the program.
Use database for quick searchIf this option is enabled, you can search the contents of the fields in the database using Route Planning.
Tip: To search for the content of a description field, enter a "+" and the term which is to be searched for.

In Field Assignment you an specify the field content which is to be searched for (see Enable browsing according to field contents).
Editing the geographic details
-
Select
Edit >  Geographic Details on the toolbar above the list.
The Geographic Details window opens.
-
Make the desired changes.
Element Description Option Geocoding is performed with location information If this option is enabled, the records are primarily geocoded using location information.
Option Geocoding is performed with coordinates or location information If this option is enabled, the records are primarily geocoded using coordinates. If no coordinates are available, geocoding is performed on the basis of the location information.
You can specify the format of the coordinates using the drop-down list.
With the check-box you can specify that the coordinates are available without a decimal point.
Changing the data structure
-
In the toolbar above the list choose
Edit >  Data Structure.
The Structure window opens.
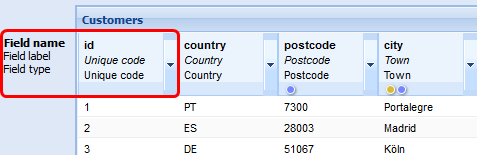
You can change the Field Label and the Field Type and add or delete fields.
-
Click on the arrow in the desired column heading
 .
.The Field Attributes window opens.
-
Make the desired changes.
Element Description Entry field Entering a field label.
When the table in the program is displayed, the field label is used as the designation of the column.
Description fieldIf this option is enabled, the content of the field is used as the description of the record. For example, the content is displayed if you point to the symbol for the record on the map.
 Enable browsing according to field contents
If this option is enabled, a search for the content of the field can be performed in the route planning.
To search for the content, enter a "+" and the term which is to be searched for.
 Delete field
Deletes the field from the table.
Please note that the Unique ID field is mandatory and cannot be deleted.
Field type Select the Field Type.
Note: Note that you cannot change field types at random. For example, it is not possible to change the field type Text into the field type Integer. A detailed list of possible assignments can be found here.
-
Create a new column in the table by clicking on
 Add field.
Changing the address display
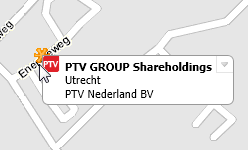
The database and the addresses on the map are displayed using a symbol. This may be a custom symbol, or a standard symbol already available in the program.
If you use a standard symbol, you can create a graphical address filter. Addresses are displayed in different colours on the map according to different criteria (e.g. sales) by means of a graphical filter.
You also have the option to specify at what zoom level the addresses on the map should be displayed, and which field should be used as a label.
Set symbols
Use custom symbol
Upload the symbols you wish to use for displaying the database and the addresses on the map.
Tip: At a later stage, you can assign different symbols to individual addresses (see Assigning different symbols to addresses). You should therefore upload all the symbols you wish to use to the database.
-
Select
Edit >  Address Display on the toolbar above the list.
-
Select the option Use custom symbol in the Symbol tab.
-
Click on Upload icon and select the desired graphics file.
Notes: Graphics files of up to 48 x 48 pixels can be displayed as symbols in the program. You can upload graphics of up to 256 x 256 pixels; these will be reduced to the size of 48 x 48 pixels. The graphics file must be in an appropriate format.
The database and the addresses will be displayed with the symbol selected.
Use standard symbol
PTV Map&Guide internet offers a collection of standard symbols you can use to display addresses on the map.
-
Select
Edit > Address Display on the toolbar above the list.
-
Select the option Use standard symbol in the Symbol tab.
-
Select the desired standard symbol.
You can display the addresses uniformly on the map or set up a graphical filter.
-
Activate the Uniform colour option.
-
Set the desired colour using Select colour.
-
Specify how large the symbols should appear on the map using the Size drop-down list.
You can create a graphical filter using the Colour range option. The addresses are displayed on the map in different colours according to the value range.
-
Activate the Colour range option.
-
Click on the Edit button.
The Set colour range window opens.
-
Select the field to which the filter should apply.
-
Specify the desired From and To value ranges in the list.
Tip: You can create new value ranges in
New. -
To change the colour, click on the corresponding field in the Colour column.
-
Save your settings.
-
Specify how large the symbol should appear on the map using the Size drop-down list in the Address display window.
Setting the visibility
-
Switch to the Visibility tab.
-
Specify the zoom level from which addresses should be displayed on the map in the Visible from zoom level area.
-
Specify which information should be displayed for each address on the map in the Labelling on the map area.
-
Confirm your changes with Save.