The Itinerary
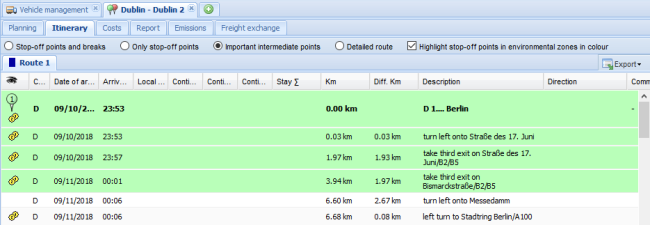
In the Itinerary tab you receive detailed information on your route. The itinerary contains details on the time at which the next route point is reached, currently driven kilometres and the driving time at each of the route points, a description of the navigation and direction details.
The height is also shown for each route point. If you only show the stop-off points, the maximum height on the previous stage is also shown.
Note: If you have calculated several routes, the results of each are shown in a separate tab (Route 1, Route 2, Route 3, Route 4). The tabs for the routes have the same colour as the corresponding routes on the map.
Customising level of detailing
Use the options Stop-off points and breaks, Only stop-off points, Important intermediate points and Detailed route to select the level of detailing displayed in the itinerary.
Customising the itinerary
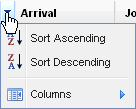
The itinerary can be customised by showing or hiding columns or sorting the entries.
Tip: A symbol is shown in the first column which describes the type of route point. A quickinfo is shown when the mouse is held over it.
-
Move the mouse to the right corner of the column heading.
A small arrow appears.
-
Click on the arrow and select the desired entry from the context menu.
-
If you wish to show additional columns or hide existing ones, click the entry Columns and highlight the required entries in the context menu.
-
If you wish to sort the list, select
 Sort Ascending or
  Sort Descending.
Note: The entries are greyed out if sorting the data is has little effect.
Enter comments for route points
You can add comments for individual route points in an itinerary. The comments are transferred when printing or exporting the itinerary so that a driver can, for example, attach detailed driving instructions to a route point.
- Click on the Comment column in the list for the desired route point and enter a comment.
Note: You can also add comments to stop-off points on the route plan (see inserting comment). The benefit of this is that comments which are entered at stop-off points are also kept when the route is saved.
Show POIs in the itinerary and include as stop-off point
If you launched the route calculation with a corridor search (see Route corridor), the POIs found along the route will be shown in the itinerary as soon as you select the level of detailing Important intermediate points.
In order to include a POI in the route planning, click on the required POI in the itinerary and select Intermediate stop-off point in the context menu. Alternatively, you can click on the POI in the map and use the context menu to include it as a stop-off point in the route planning.
Exporting an Itinerary
You can use the  Export button to export the itinerary in the following data formats:
-
Excel® export (*.xls)
-
CSV-Export (*.csv)
-
PTV Navigator file (Guided *.bcr)
Note: For the route to be sent, the corresponding end devices must be created in the device management (see In PTV Map&Guide intranet: Set up end device and send route).
-
Email
Note: Sending an itinerary by email is therefore only possible if a mail server has been set up in the administration tool.
Note: Please note that the hidden columns are not exported during an Excel® or CSV export.
Tip: Route points in low-emission zones are denoted with colours in the itinerary. You can switch off these markers (see Route planning settings).