Where can I find what? The new interface ...
As a PTV Map&Guide desktop user, you are probably interested in where you can find the most important functions for planning transport routes using the PTV Map&Guide internet interface.
Open use cases
Use cases can be opened in PTV Map&Guide internet via the title bar. Each use case opens in its own tab. You can switch between use cases using the tabs or via the title bar.

(1) Here you can open a new use case.
(2) Here you can switch between open use cases.
Would you like to know more about the integrated use cases? Then we recommend the article Primeros pasos: ¿cómo empiezo?
Route planning use case
We have redesigned route planning according to the requirements of modern software products.
Opening and saving a route
You open and save routes via the toolbar.
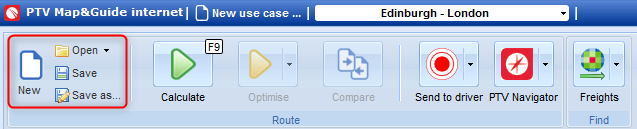
Calculating and optimising a route
The functions are no longer located below the stop-off point list, but are shown prominently on the toolbar.
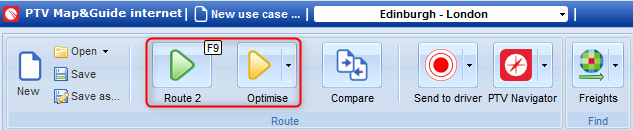
Consejo: The function  Compare routes gives you an overview of the different costs, driving distance and driving time of two selected routes. This makes it easy to see whether selecting another vehicle or changing the routing parameters will produce a better result for you.
Route planning settings
The route planning settings are located above the stop-off point list.

(1) The routing parameters are displayed as symbols.
(2) You can change details regarding the routing parameters by clicking the  symbol.
(3) The cost profile, wage profile and number of drivers can be selected directly in the settings.
Detailed information on route planning in PTV Map&Guide internet can be found in the table of contents of the Online help under Planning a route and Evaluating routing results.
Data Manager use case
The Data Manager has been redesigned, making it easier to use.
When you open the Data Manager, only the Administration tab is displayed initially. In this tab you create your databases, either as empty databases or by importing a csv file.
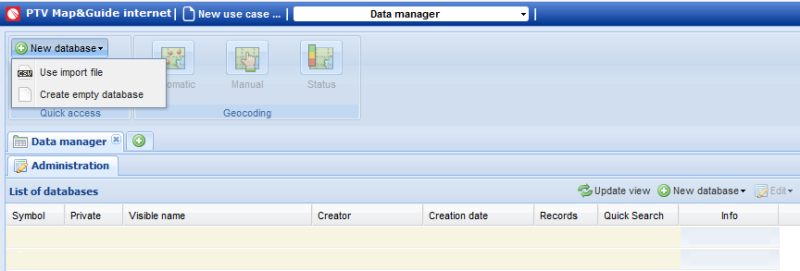
As soon as you have created an address list, it will be shown in the Administration tab. Double-click to open the database and the geocoded addresses will be displayed in a separate tab.
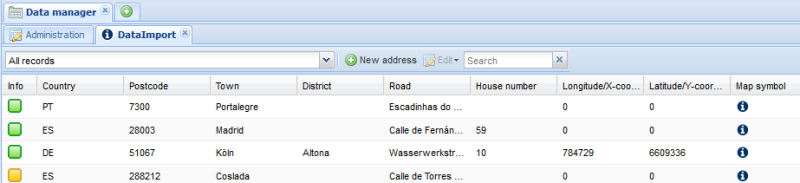
En la columna Información de la lista de direcciones se mostrará mediante símbolos de diferentes colores si hubo una divergencia en la geocodificación entre los datos de ubicación de la dirección importada y la dirección del mapa. Las direcciones desplazadas manualmente también se marcarán.
Si falta el símbolo en la columna Información, no se puede geocodificar la dirección.
| Símbolo | Descripción |
|---|---|

|
Los datos de la dirección importados no coinciden con la dirección asignada en el mapa. |

|
Las direcciones importadas se han geocodificado manualmente mediante el mapa. |

|
Pequeñas divergencias entre datos de direcciones importados y direcciones asignadas en el mapa. Esto puede darse, por ejemplo, si la dirección importada tenía un número de casa pero no se encontró en la base de datos de ubicaciones de PTV Map&Guide internet. En tal caso, el conjunto de datos se geocodifica en el punto medio de la calle. |

|
El conjunto de datos importado se asignó a una posición del mapa a través de unas coordinadas determinadas. |

|
Mayores divergencias entre datos de direcciones importados y direcciones asignadas en el mapa. |
For more information about working with the Data Manager, see Data Manager in the table of contents of the Online help..
Vehicle Management use case
In PTV Map&Guide desktop, vehicle types and the associated costs, speeds, technical data, etc. were defined in the options. The vehicles of the fleet were created in vehicle management.
We have removed this distinction.
PTV Map&Guide internet contains an entirely new vehicle management system. All vehicle settings are changed in a completely separate use case, Vehicle management.
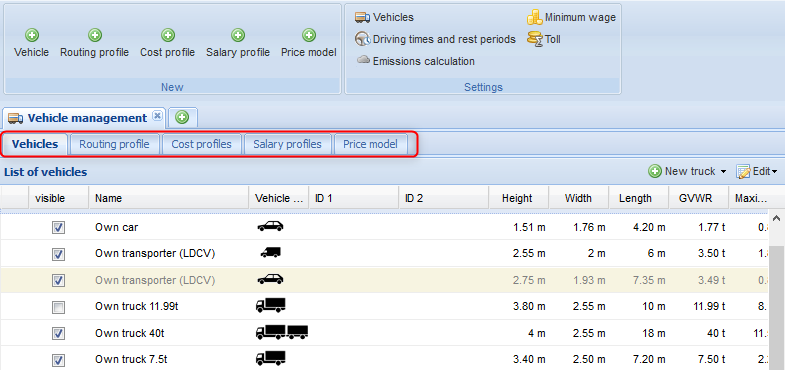
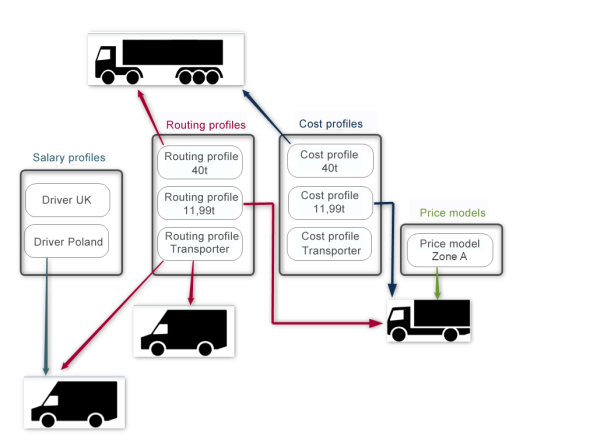
Instead of entering the properties for each vehicle individually, you can create your own cost/routing and salary profiles, and define a price model, in Vehicle management. You must always assign a routing profile to a vehicle; a cost or salary profile and a price model can also be optionally created and assigned.
In the use case Vehicle management, various tabs are available.
-
Vehicles:Creation of vehicles with all technical data. Every vehicle must have a routing profile assigned to it. Assigning a cost and salary profile, or a price model, is optional.
-
Routing profiles: In the routing profile, settings are defined that have a significant influence on the route, for example optimisation for the shortest or fastest route, or the speed of different road types.
-
Cost profiles: In the cost profile, fixed and variable costs of the vehicle type are recorded and the times to be included in the cost calculation are specified. You can also specify here whether the toll is to be included in the costs.
-
Salary profiles: You can specify the salary for different driver types in the salary profile.
-
Price models: You can set freight cost surcharges per stop-off point and kilometre-based surcharges using a price list. You also have the option of calculating additional costs using a tariff zone model.
You can find detailed information in the article Gestionar vehículos y asignar costes
Administration tool
As is the case for PTV Map&Guide desktop, a separate administration tool is available for PTV Map&Guide internet. In PTV Map&Guide internet, you open the administration tool via the title bar > My account > Administration tool.

An overview of the administration tool can be found in the article The Administration Tool . A dedicated Online Help is also available for the administration tool.
However, PTV Map&Guide internet not only has a new interface and future-proof technology. Unlike PTV Map&Guide desktop, PTV Map&Guide internet offers a number of new functions to help you calculate offers and monitor your transports (see What can PTV Map&Guide internet offer you? ).