The Administration Tool
All administrative work is carried out in PTV Map&Guide internet in its own program, the administration tool.
You can create groups with different access rights in the administration tool. You can assign users to a group, thereby assigning them the appropriate rights.
In PTV Map&Guide internet, you open the administration tool via the title bar > My account > Administration tool.
Note: This is only possible if you have administrator rights. Log in using the access data you received from us via email.
First Start
When you open the administration tool for the first time, the First start window appears. Here you can select the following settings in the individual tabs:
Change prefix
By using a prefix, we ensure that all of the users of PTV Map&Guide internet across the world each have a unique name. We pre-set a prefix, which is made up of part of the company's name and its customer number.
The user name, which has to be entered when calling up PTV Map&Guide internet, is made up of a prefix and the entered user name.
Example of a user name with a prefix: PTV12.defaultuser
You can configure the specified prefix when first starting or via the toolbar > Administration area >  Change prefix.
Note: If you have already created users and then change the prefix, the change affects all created users. As the prefix is an integral part of the user name, all of the user names also change. Therefore, if you edit a prefix, don't forget to forward the new access data to the users.
Edit internal support data
The internal support data are displayed when the user clicks on the Do you need help? link on the login page of PTV Map&Guide internet.
You can configure the internal support data when first starting or later via the toolbar > Administration area >  Interne Supportdaten ändern.
Creating administrators
If you do not wish to personally administrate PTV Map&Guide internet, you can create an administrator here. The administrator automatically receives all the necessary rights and is assigned to the Administrator group.
Note: Don't forget to send the new administrator the access data for the administration tool.
Tip: In the administration tool, a user is automatically created with login details (email address and password) that can be used to register in the shop. This user is the "super administrator" and cannot be deleted. The super administrator has full access rights to user and group management and can book or cancel licences in the shop. If additional users need administrator rights, the super administrator can issue these rights. However, these administrators cannot access the shop and cannot book or cancel licences.
The super administrator automatically has access to PTV Map&Guide internet and uses one licence.
If you don't want to use PTV Map&Guide internet as administrator, you can deactivate yourself as user by changing the status to inactive and assign the licence to another user.
The interface
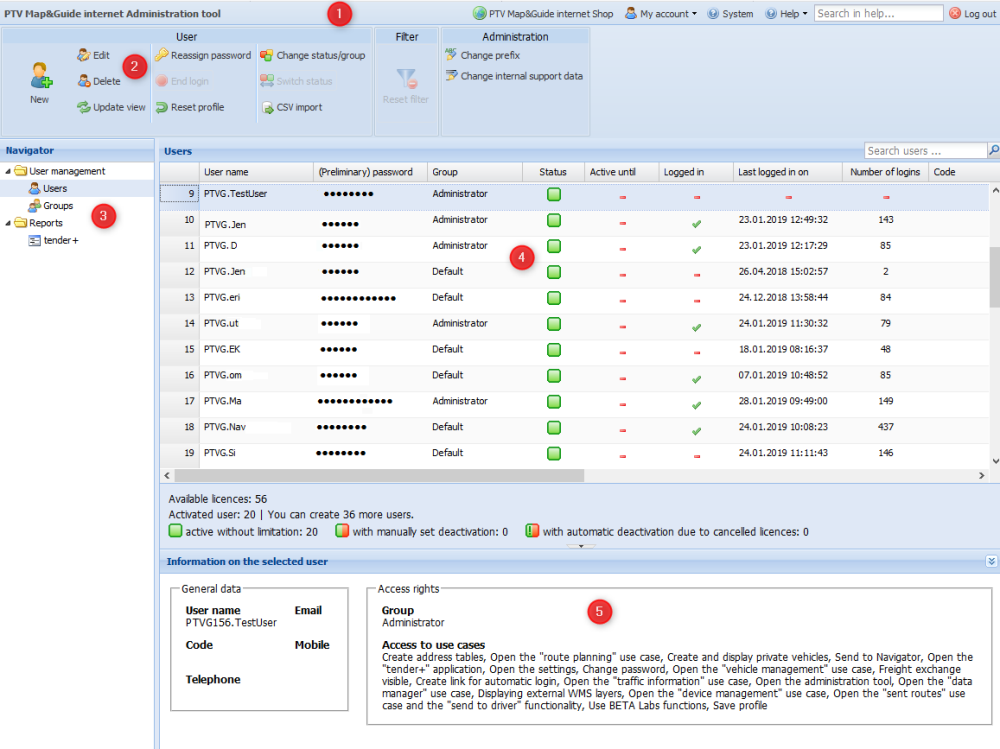
The administration tool's interface is split into different areas. The basic layout is always the same, however the functions provided are different depending on the selected entry in the navigator (Users or Groups).

(1) Title bar
General functions are available in the title bar and you can call up the Help function or search for a term directly via the Help function.
(2) Toolbar
Depending on the selected program area, functions for users or groups are displayed in the toolbar.
(3) Navigator
Here you can switch between user and group administration.
(4) List with users or groups
(5) Detailed info
This area displays more information about the selected user or group.
Group administration
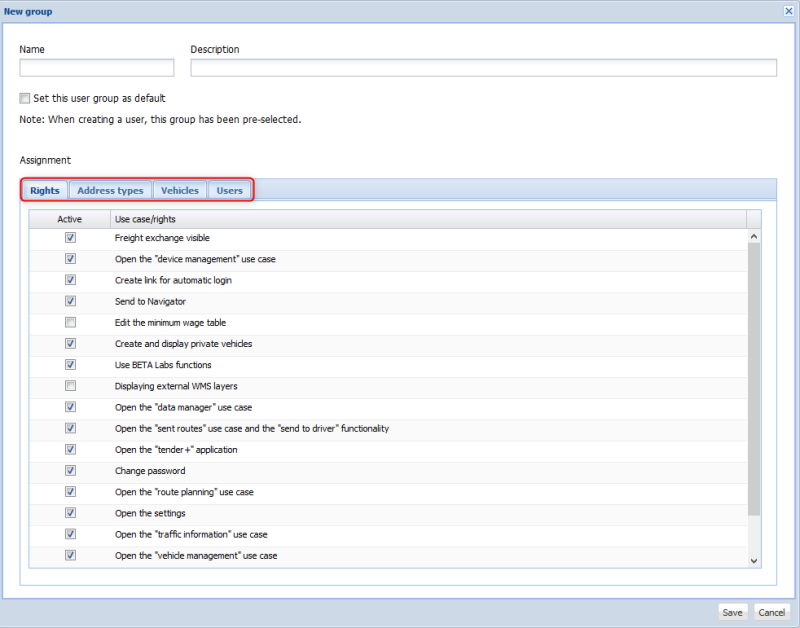
You can create groups in order to restrict the users' rights. In a group, you can, for example, determine that the rights to the Route planning and Data manager use cases are available, but that the Vehicle management use case is not displayed.
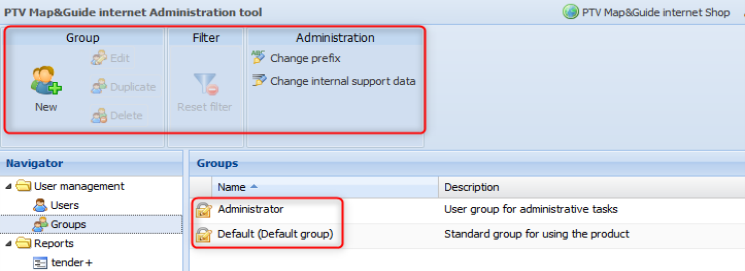
Two user groups are defined in group administration.
-
Default
In the Default group all of the access rights for PTV Map&Guide internet are available. However, assigned users do not have the right to open the administration tool. The group is preselected when a user is created, unless you specify a different group as the default.
-
Administrator
All access rights to PTV Map&Guide internet are also activated in the Administrator group. In addition, a user who is assigned to the Administrator group also has access to the administration tool. He can therefore administrate users and groups.

You can use the toolbar to create, change, duplicate, or delete groups.
In the Administration area, you can change user name prefixes and specify what users see when they click the Do you need help? link when logging into PTV Map&Guide internet.
When you create a group, you can activate or deactivate rights, define access to address types and vehicles, and assign the desired users to the group.

User administration
You create users in the program area User. Alternatively, you can import user data from a csv file.

Create user manually
-
In the navigation tree, select the entry User Management > Users.
-
Click on the tool bar > area User on New.
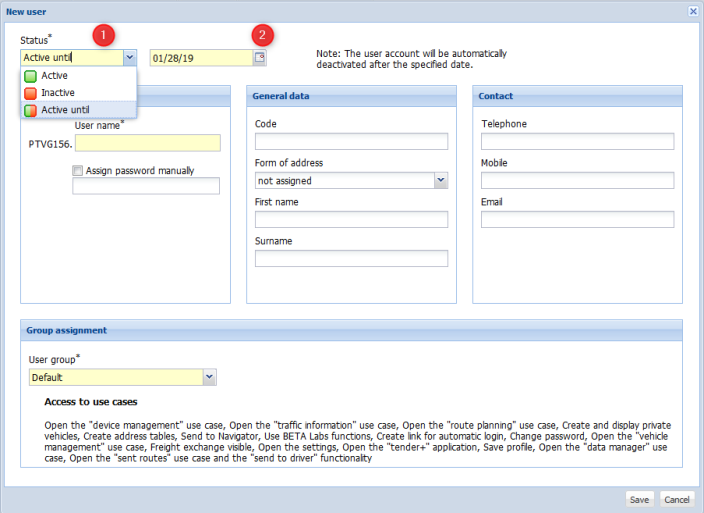
The New user window opens

Note: Important: In the administration tool you can create as many users as you wish; however, the number of users activated to use PTV Map&Guide internet cannot exceed the number of licences available. If there are no more free licences available, the recently created users are automatically assigned the status non-active.
In the drop-down list (1), you can set the status of a user.
 Active: The user can use PTV Map&Guide internet for an unlimited period of time.
 Inactive: The user has been created, but cannot use PTV Map&Guide internet. Inactiv users do not require a licence.
 Active until <Date> (2): With this entry you can select the date until which the user can call PTV Map&Guide internet. After the date, the user is deactivated and the licence is once again available.
Importing Users
This allows you to import user data from a csv file.The sequence of fields has been fixed:
user name;password;group;code;form of address;first name;surname;email;telephone;mobile
Note: The CSV file must not contain all the fields. You can, for example, import a file in which only the user name is set by default. The sequence of fields has, however, been fixed.
-
In the navigation tree, select the entry User Management > Users.
-
Go to the tool bar > User area and click on CSV import.
The CSV import window opens.
-
Make the desired settings
Note: You can activate the option Automatically activate imported user. However, only as many users are activated as there are licenses available. The status of other users is automatically set to Inactive,
For more information about working with groups and users, open the Online help for the administration tool.